
Quick links
Set up
The material system in Unreal Tournament 3 is quite a bit different from the one found in Unreal Tournament 2004, it is much more lenient and allows for a lot more advanced effects. Even so, you can approximate many of the material effects found in UT3 by using certain techniques.
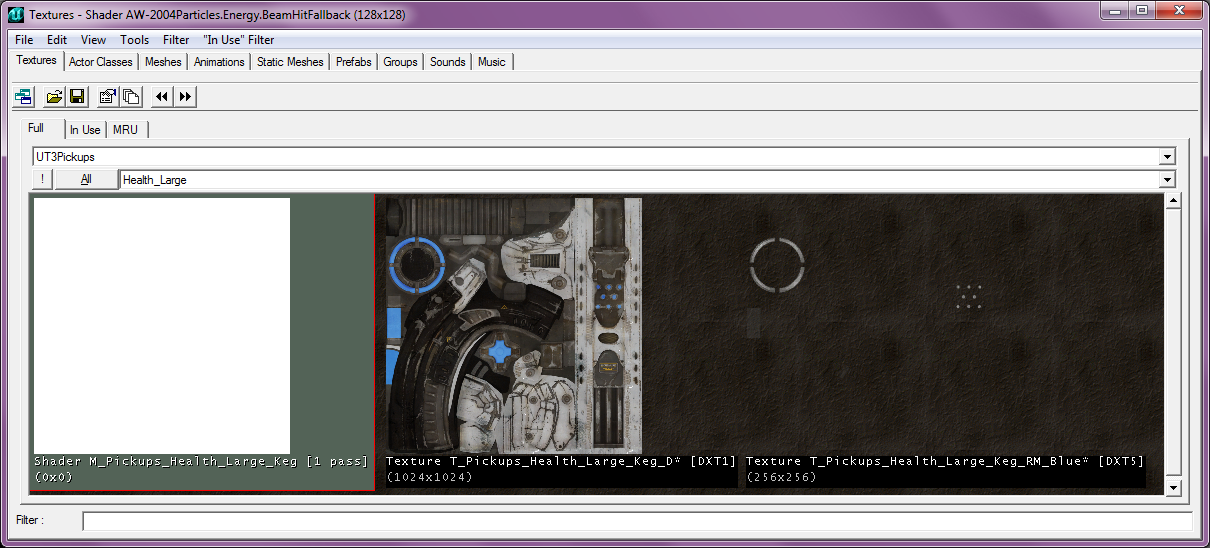
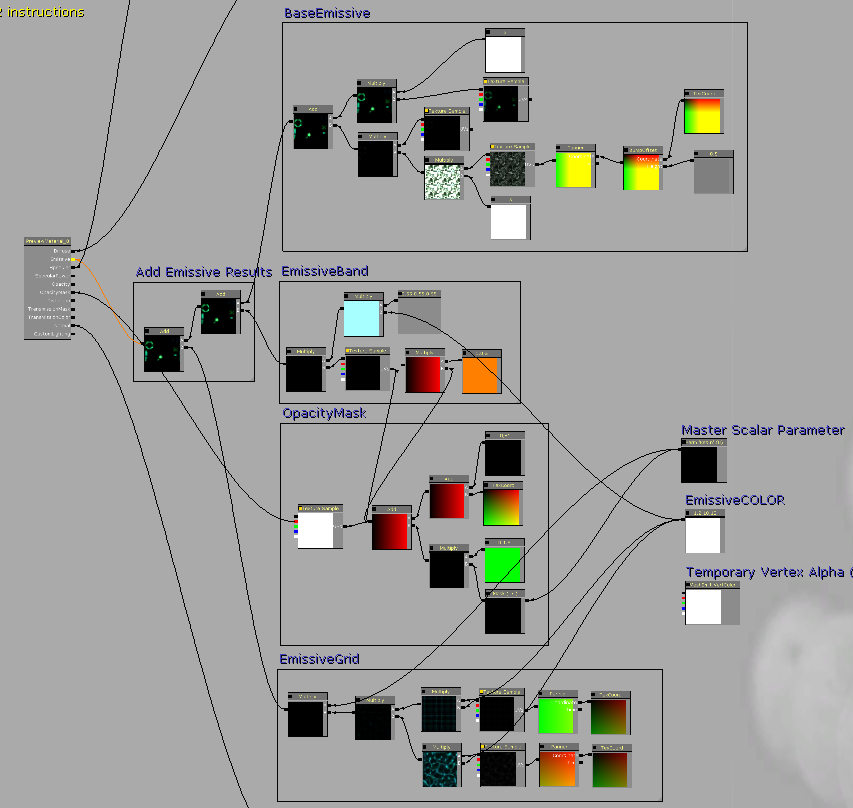
First of all, before starting, you need to prepare the tools. You will obviously need to have both UT3 and UT2004 installed in order to make use of their editors. Then you will also need the UE Model Viewer in order to export textures from UT3. Lastly you'll need the GIMP in order to edit the exported textures to fit the UT2004 material system, as well as the DDS plugin for GIMP.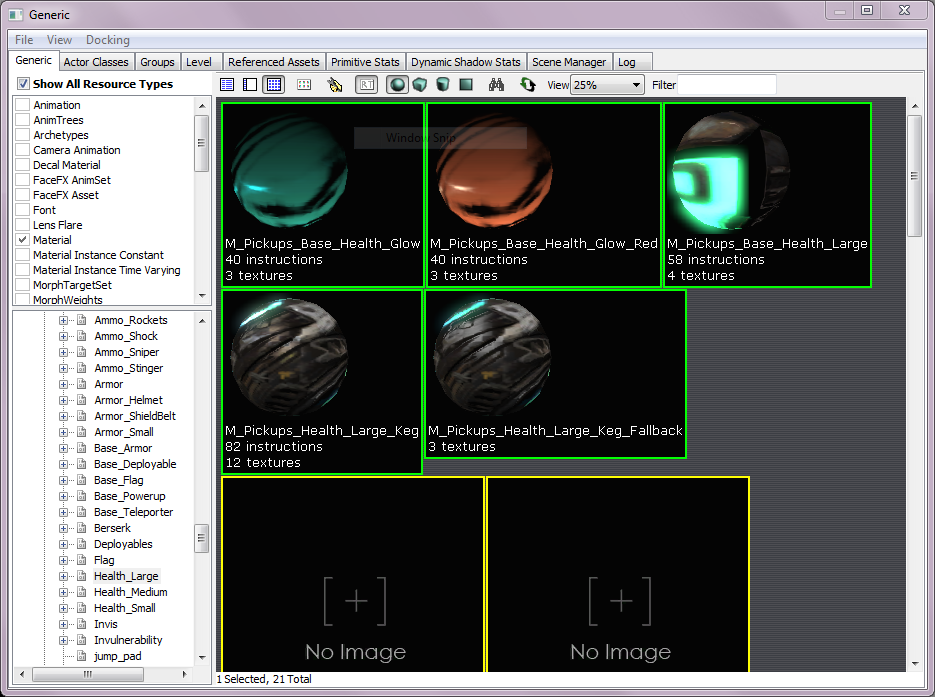 The first step to take when porting materials is to find the material you wish to port in the UT3 Editor. Open the Generic Browser, set the type to Material or All (I prefer All, because sometimes you need to manually set a preview mesh to a material in order to see how it looks in reality). Then find your material from the list. Vehicle materials are under VH_*, weapons are under WP_*, pickups are in PICKUPS and PICKUPS_2. The materials are usually in a group called Materials. Once you find it, double-click it to open the material editor. Typically it will look like this:
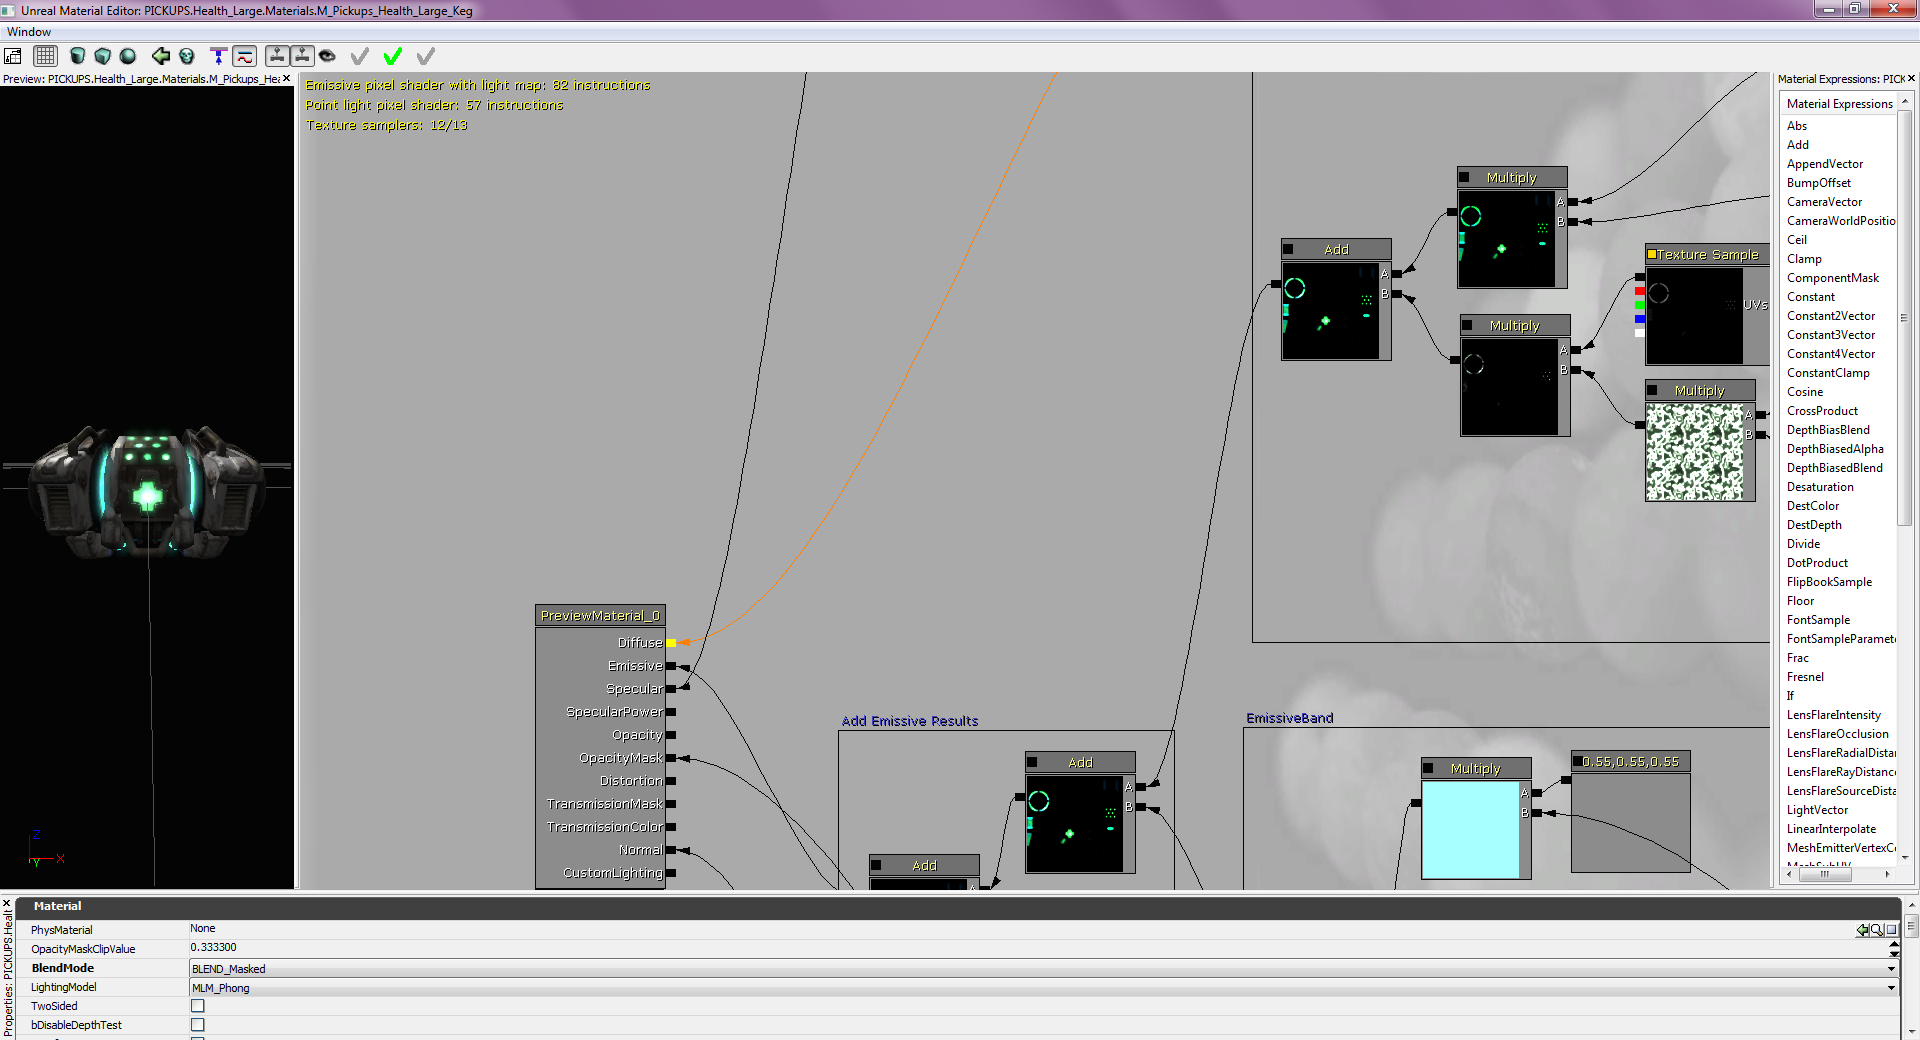
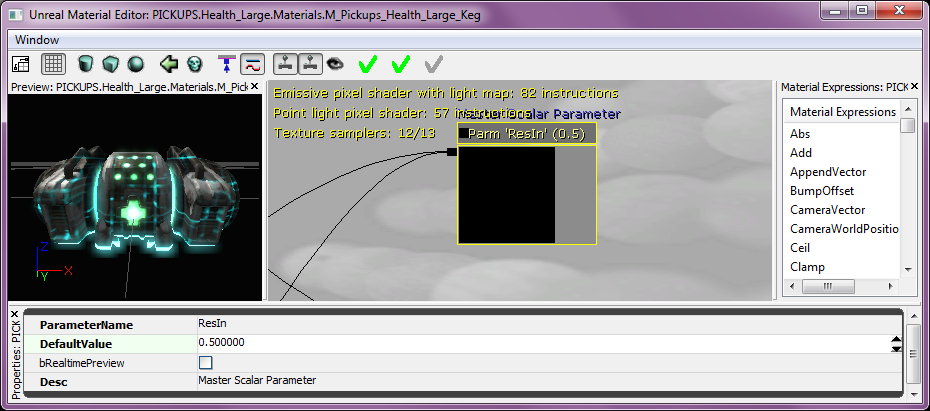
 I will use the above image as a reference throughout the guide. Once you have the material editor open, launch UnrealEd 3 (the UT2004 editor). Now let's analyse what we see in the material editor. Normally you start reading from the material instance block all the way to the left, from top to bottom. The block itself is equivalent to the UT2004 Shader material. You can create one right now: in UEd 3, open the texture browser and press File → New. In my UT3 mod, I have adopted a scheme that every ported material in UT2004 needs to be in a package named UT3[Package name]_Materials (in the case of our example, UT3PICKUPS_Materials). Then the group name and the material name are the same as in UT3, in our case Health_Large and M_Pickups_Health_Large, respectively. Make sure the material type is set to Shader.
Diffuse channel
 Now go back to the UT3Ed Material Editor. Hover your mouse over the black square next to "Diffuse" and the connect point will be highlighted, allowing you to see what is assigned as the Diffuse texture. That is equivalent to the Diffuse slot in UEd 3 Shader properties. In our case, the Diffuse slot is connected to a Diffuse box in the Material Editor. The boxes are there for ease of reference.
 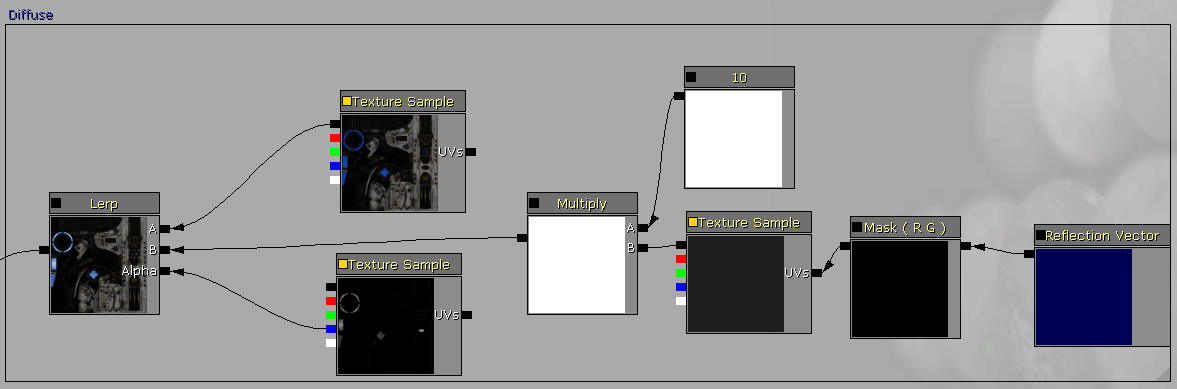 In the box, it's best to start reading from right to left. First we have a Reflection Vector, connected to a Mask. These two have no equivalents in UT2004 as far as I know, and they don't make much of a difference, so you can ignore them. If you want, you can break the link so that the preview would show approximately what you can expect to get in UT2004: right-click on the box on the left the the Mask and select Break Link. You will see a slight difference in the preview image, but too small to worry about.
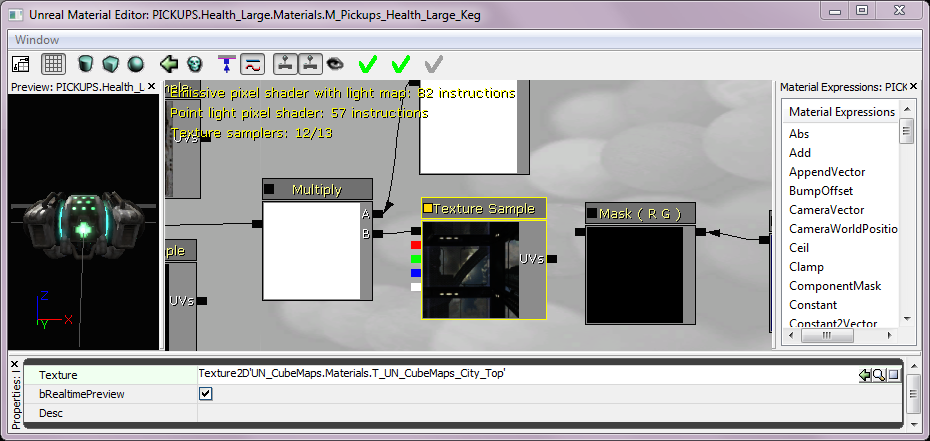 Next we have the Texture Sample. These are the most important parts of any material, because these are basic textures, before any effect is applied to them. Click on it, and at the bottom you'll see a reference to the texture. In our case it's Texture2D'UN_CubeMaps.Materials.T_UN_CubeMaps_City_Top'. You'll need to export this texture and reimport it into UEd 3. To do that, we need to use the UE Model Viewer. If you're on Windows, create an empty folder (for instance, "ut3-export") somewhere (it's convenient to put it into My Documents), put the UE Model Viewer binaries into it, then open the command prompt. Use the cd command to go to the folder you made (the command prompt starts in your user folder, so I needed to use cd Documents\ut3-export), then use a command like this: umodel.exe -export -dds -groups -noanim -nostat "\Program Files (x86)\Unreal Tournament 3\UTGame\CookedPC\Pickups\Pickups.upk" The -export switch tells it to export the textures, -dds tells it to export in DDS format, -groups tells it to preserve groups in the folder structure it will create, -noanim means to not bother exporting animations and -nostat means to not bother with exporting static meshes. Now if you look at that folder you created, you'll see one or more new folders, with group folders in it, and with the exported textures inside. In our case, find "UN_Cubemaps/Materials/T_UN_CubeMaps_City_Top.dds" and import it in UEd 3 as UT3UN_CubeMaps_Materials.Materials.T_UN_CubeMaps_City_Top.
 Let's continue analysing the material chain. Next we have a Multiply block, and another block named "10". That means that the colours of texture we just imported get multiplied by 10. If you press the square to the left of the Multiply block header, it will show you how the texture looks after the multiply is done. In UEd 3, you can approximate this behaviour by creating a Combiner where its two materials are the same texture, the operation is Multiply and Modulate4X is set to True. However, doing that is needlessly expensive, because of one of the limitations of the UT2004 material system: you cannot use two complex materials in a combiner. We'll get to that later, but for now let's continue analysing the material.
Next in the chain is a Lerp block. Lerp stands for Linear Interpolation, and can also be approximated by a combiner. We have another Texture Sample connected to the A slot, Texture2D'PICKUPS.Health_Large.Materials.T_Pickups_Health_Large_Keg_D', so import that into UEd 3 as well, by repeating the import procedure mentioned earlier. In the Alpha slot of the Lerp block we have a yet another texture, Texture2D'PICKUPS.Health_Large.Materials.T_Pickups_Health_Large_Keg_RM'. However, before importing that, it needs some adjustments.
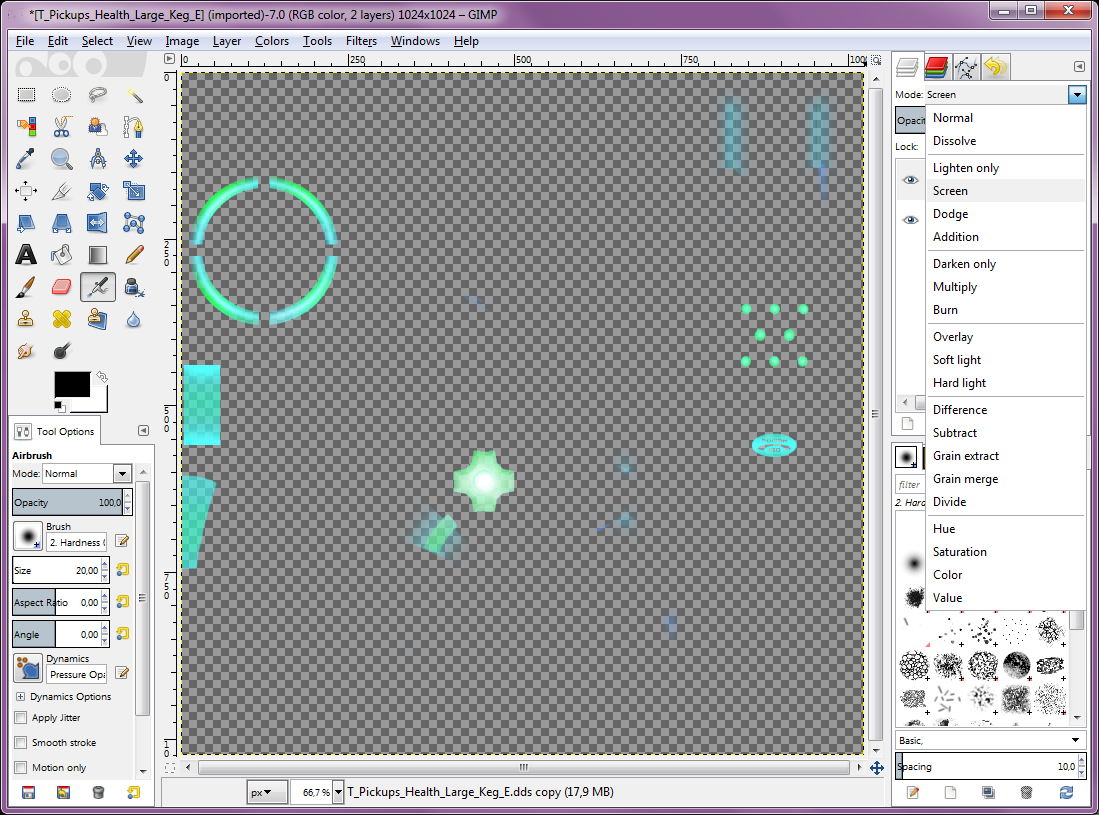
In UT2004, if you want to do something with the Alpha channel (transparency), you need to use a texture that has an Alpha channel defined. In contrast, in UT3 you can use any channel (red, green, blue, alpha, or all at once) as an Alpha channel. Typically UT3 materials make use of this UT3 feature and put the Alpha channel as one of the other channels in a texture. If you look at the Material Editor, you'll see that the arrow connecting the texture sample with the Lerp block comes not from a black square, but from a blue one. That means it uses the blue channel as the Alpha channel. So let's edit the texture and apply the blue channel as the Alpha channel in GIMP.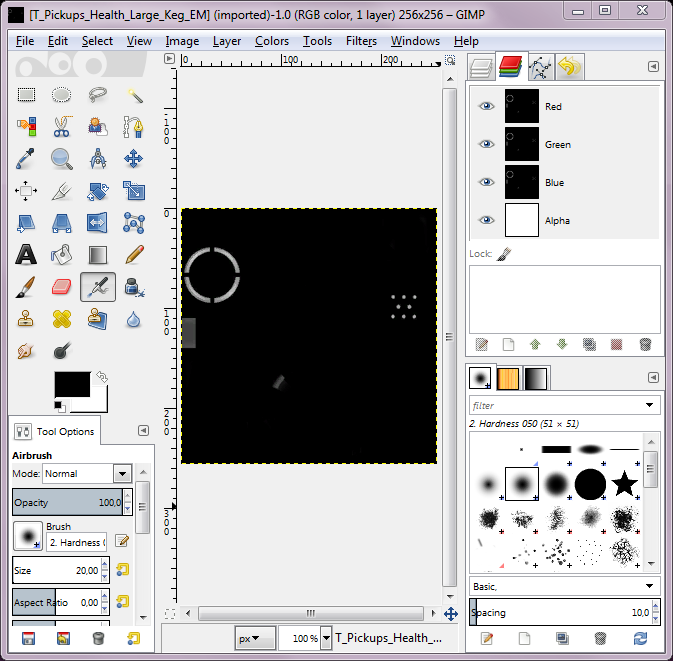 Launch GIMP, install the DDS plugin as per instructions, then import the texture we need, then click on the Channels tab. You can see that the Red, Green and Blue channels are mostly black, and the Alpha channel is mostly white. A completely white Alpha channel means that there is no transparency. We need to fix that.
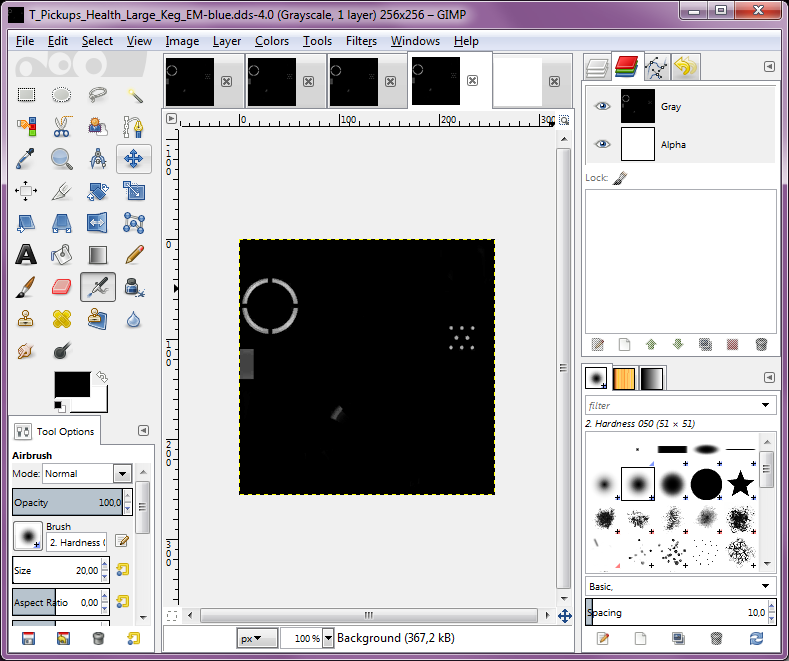
From the menu select Colors → Components → Decompose..., set the colour model to be RGBA, and deselect Decompose to layers (you could leave it on and have the channels split into layers, and not separate files, but it's more convenient to just split into different files). Now you'll notice that there are several tabs, and the window name will show which channel contents it is. In this example, I have the blue channel open. You can click around on the other tabs to see if the other channels are different than the one you're on. In our case, they are all the same.
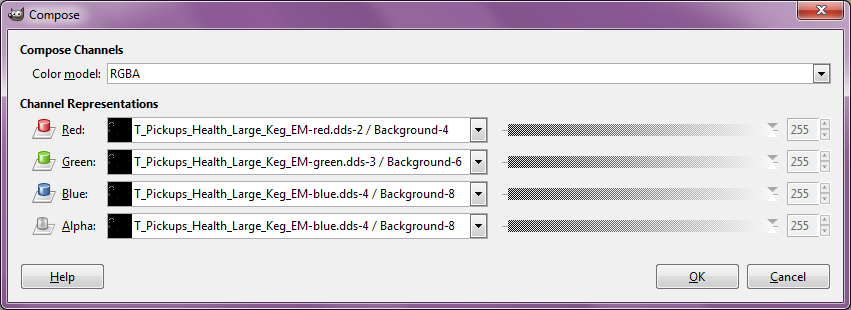 Now we need to reassemble the texture with the correct Alpha channel applied. Select Colors → Components → Compose..., change the colour mode to RGBA again, set Alpha to be the file with "-blue" in its name, and set the other channels to any channel (as they are all the same in our case; if they were different, then you'd want to set them to their original channels, as shown in the screenshot here). That results in a mostly transparent texture, which is exactly what we want.
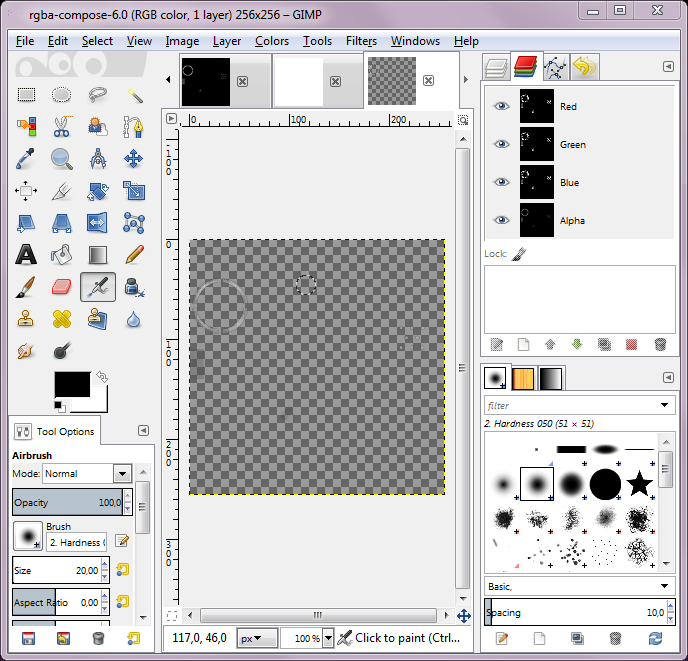 Now select File -> Export... and export it somewhere. Name it what the original was, appended with the colour name whose channel you put into the Alpha slot, and the extension .dds (in our case it's T_Pickups_Health_Large_Keg_RM_Blue.dds). When asked, set the compression to BC3/DXT5 (this is the compression method that preserves all the Alpha channel data).
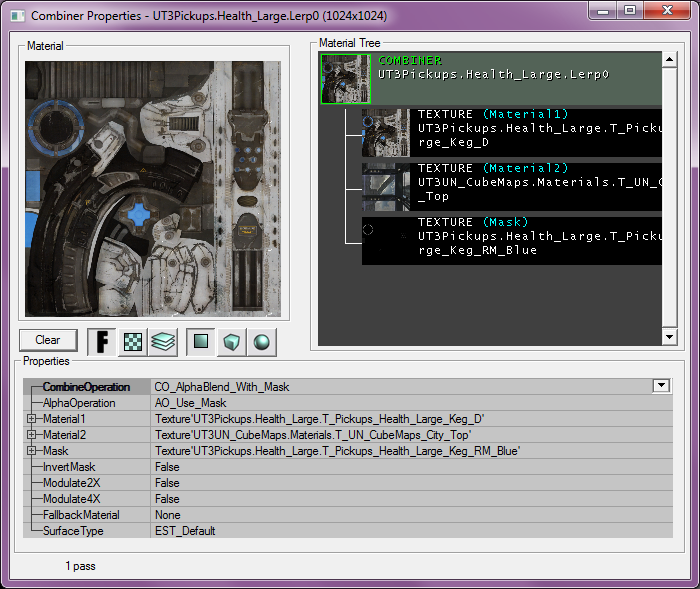
Import the newly saved texture into UEd 3 (don't forget to check the Alpha box when importing). Now you should have three materials in total. Let's start emulating the Lerp block. In UEd 3, select File → New..., set the MaterialClass to Combiner, and give it a name (I usually use the same names as the blocks I'm trying to emulate, so in this case Lerp0 – in case there are more Lerp blocks I'll need to emulate down the road). In the combiner properties, set Material1 to be what is set as A in the Material Editor (the ..._D texture, which is short for Diffuse), Material2 to what is B (in our case T_UN_CubeMaps_City_Top), and the Mask to our newly imported texture (..._RM_Blue). Then set the CombineOperation to CO_AlphaBlend_With_Mask. That's it, we have emulated the Lerp block.
Check the Material Editor again. You can see that the Lerp block is the last block in the chain before connecting to the Diffuse channel of the material. Do recall that we skipped one step due to combiner limitations in UT2004 (the Multiply block). If you check your Lerp0 combiner, you will see that it combines two simple Textures. Since they are not complex, the UT2004 engine will alow you to replace one texture with a Combiner. So let's do that.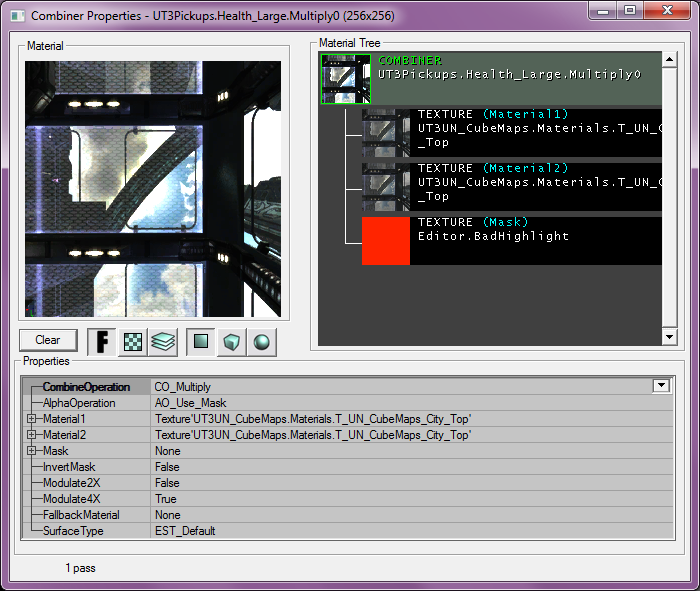 Create another Combiner as we did before, and call it Multiply0. Set its both Material1 and Material2 to T_UN_CubeMaps_City_Top and set the CombineOperation to CO_Multiply. That will make the texture darker – not something we want; so set Modulate4X to True and it will become much brighter. You always want to double-check the brightness with the Material Editor, so you don't accidenatlly overshoot (Multiply with 10 in UT3Ed is actually quite close to CO_Multiply with Modulate4X in UEd 3). Open the properties of Lerp0 and set Material2 to our newly created Multiply0. You'll see the reflection on the ring become much brighter.
A general observation: the resulting Lerp0 material is completely static. If in need, you could create a material just like that in GIMP, and it would look the same. But since the engine allows us to do that in runtime, and thats what UT3 does, we can leave it as is right now.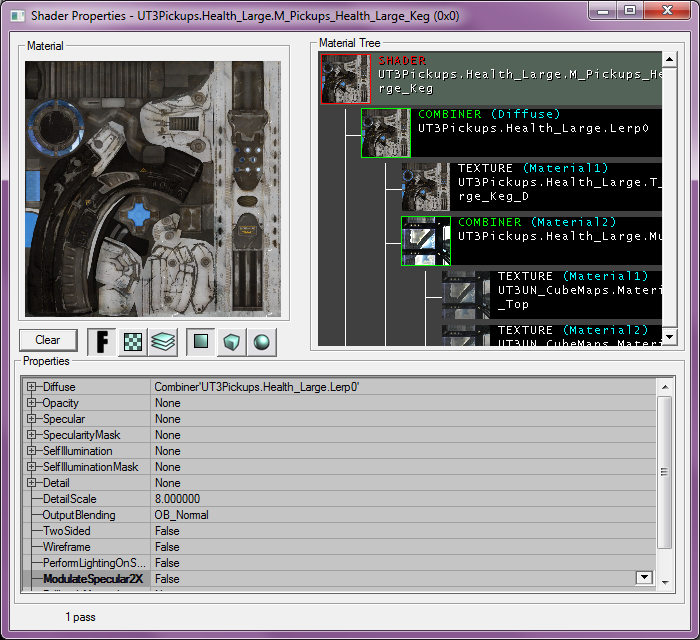 Now connect the Lerp0 material to our main shader's Diffuse slot. Once that's done, let's move on to another slot. Look at the Material Editor again. The next channel in the material is called Emissive.
Emissive channel
The Emissive slot is connected to a box called Add Emissive Results, which in term connects to three other boxes: BaseEmissive, EmissiveBand and EmissiveGrid. On the right, you can also see an unboxed block called Master Scalar Parameter. Click on it, and set its DefaultValue to 0.5. You'll see the preview image change. This shows that the Master Scalar Parameter is a modifier that defines the ResIn effect (the respawn effect). When it's at 0, there is no effect. Since in my mod the spawn effect is handled by UnrealScript, I ignore the effect altogether when porting materials. If you follow the connections of the Master Scalar Parameter, you'll see that it controls the visibility of the whole EmissiveGrid box. You cen reset the Master Scalar Parameter to 0, then have the second Add from the Add Emissive Results connect to Emissive and you'll see that the preview doesn't change at all, because the first Add simply adds the effect of the EmissiveGrid box (which is disabled when the Master Scalar Parameter is set to 0).
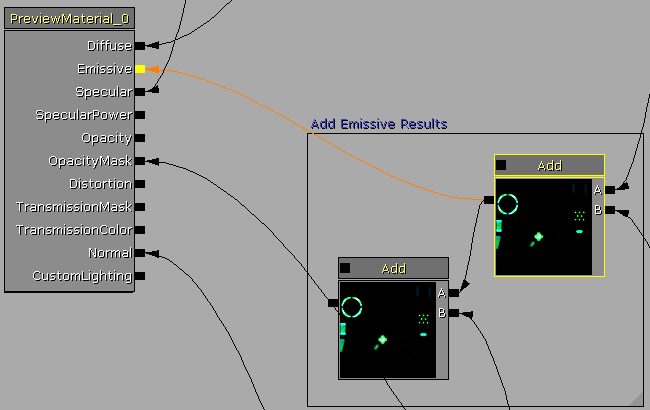 If you connect the Add of the BaseEmissive box to the Emissive channel directly, it will also not change the preview picture. That's because the second Add from the Add Emissive Results box adds BaseEmissive and EmissiveBand together, and EmissiveBand gets disabled by the Master Scalar Parameter as well (just indirectly, by changing values in the OpacityMask box, which then propagates through its Add block to the EmissiveBand box). So in the end we can ignore both items from the Add Emissive Results box and jump right into BaseEmissive.
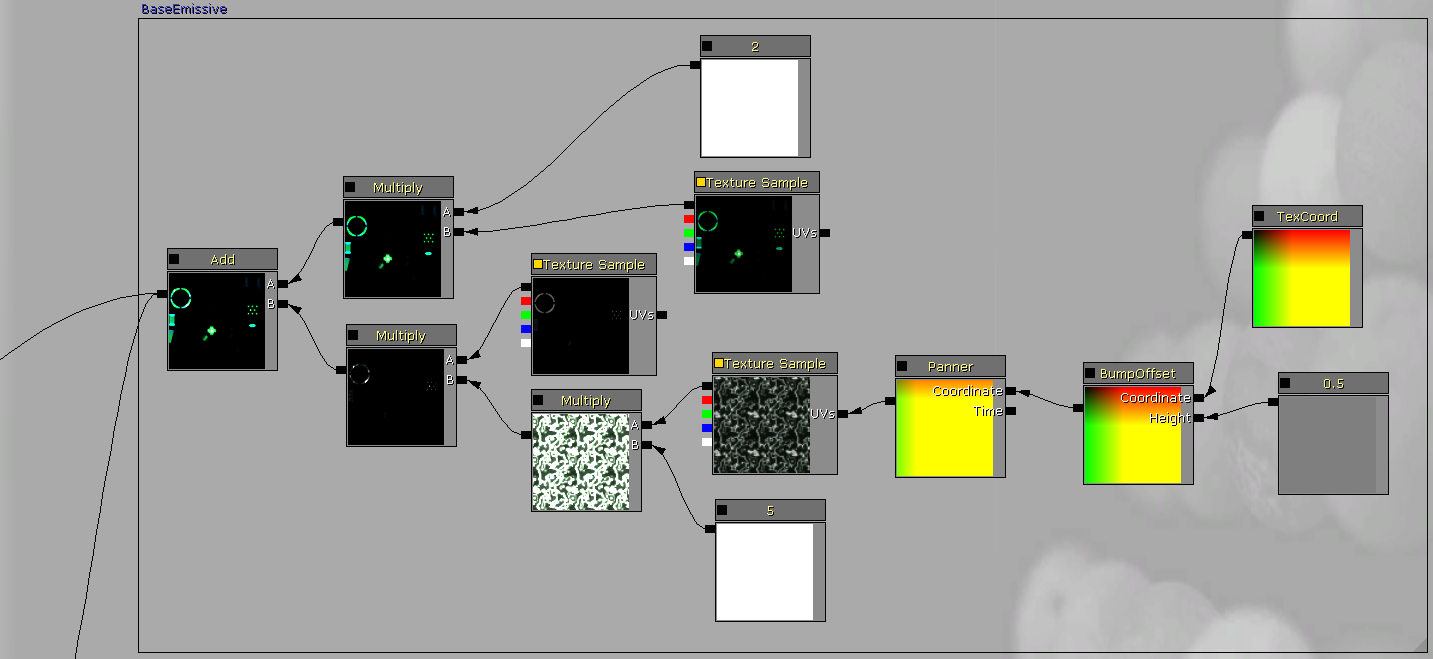 Let's start analysing this box, once again from the right. First we have a TexCoord block. The TexCoord is an equivalent of the UT2004 TexScaler, but due to the way it works in UT3, its position is before the texture it affects and its properties (UTiling and VTiling) are inverted in a TexScaler. Let's note it, but let's wait until we get to the texture it affects before doing anything.
The next block is called BumpOffset. It has to do with normal maps, which UT2004 cannot render, so simply ignore it.
Next is a block called Panner. It's an equivalent of the UT2004's TexPanner. Its properties also need to be recalculated to make it work as intended in UT2004, but we'll get to that a bit later.
Next is a Texture Sample, Texture2D'WP_LinkGun.Materials.T_WP_Linkgun_Plasma01'. Import that into UEd 3. Now let's take care of those TexCoord and Panner blocks we went over. In UEd 3, create a new material of type TexScaler, and call it TexCoord0.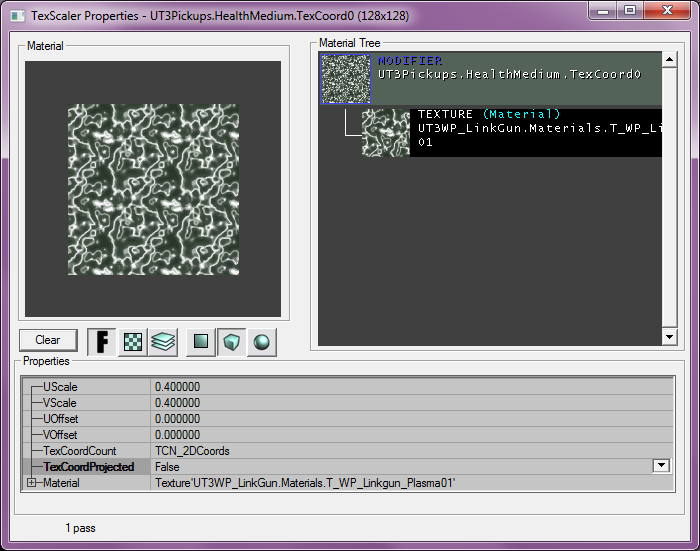 Set its Material to T_WP_Linkgun_Plasma01. Now look at its properties in the Material Editor. It has UTiling of 2.5 and VTiling of 2.5. Recalculate that into UScale and VScale with these formulas:
$$UScale = \frac{1}{UTiling}$$
$$VScale = \frac{1}{VTiling}$$
We get 0.4 for each, so add that to the TexScaler properties.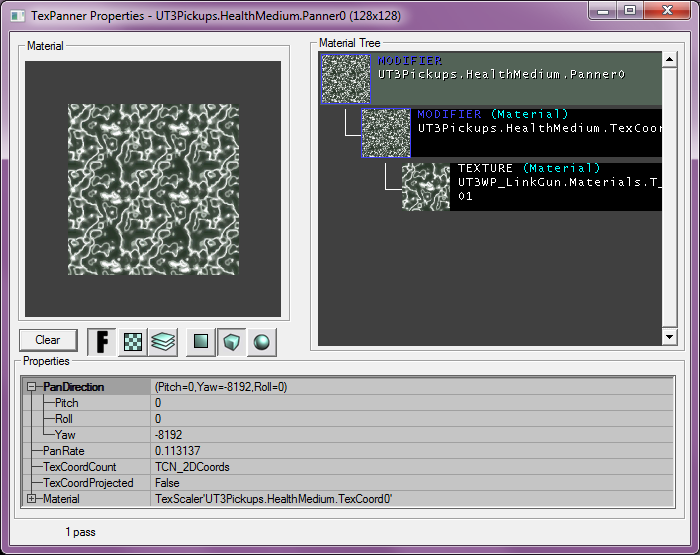 Then create a TexPanner to emulate the Panner block (call it Panner0). In the Panner block properties, you can see that it has SpeedX and SpeedY parameters. A TexScaler doesn't have anything like that. So it's a bit of a problem. You might need to do some trial and error here. In UT3, the Panner properties are linked to the TexCoord, while in UT2004 the TexPanner and TexScaler are completely separate. After some thinking and testing, it seems that the right formula to calculate the PanRate of the TexPanner is this:
$$PanRate = \frac{\sqrt{(SpeedX^2+SpeedY^2)}}{UTiling}$$
This is provided that the TexCoord had the same values in UTiling and VTiling. In our case, we get 0.113137 as the result, which visually seems to be right. Note that this only defines the speed of the TexPanner, and by default it pans to the left. In the Material Editor, we see that we want to pan to the bottom and left. In a TexPanner, this is defined by PanDirection → Yaw. 16*1024(=16384) is a 90° angle (pans up). Since we want it to pan exactly downwards and to the left, we need to set it to -8*1024(=-8192). This is not so nice when the Panner has non-equal speeds on both axes. Then you need to use a trigonometric formula to get the needed value. In Radians, we would use this:
$$Yaw = \frac{\arctan\left(\frac{SpeedY}{SpeedX}\right)}{\tau}\cdot64\cdot1024$$
where τ = 2∙π. This formula comes from solving a trigonometric equation that involves adding two vectors of size SpeedX and SpeedY and then finding the angle between the new vector and SpeedX, in case you're wondering.
Now that we're done with maths, let's continue analysing the Emissive chain. Next we have a Multiply with 5. Once again you could use the procedure that we did beforehand, but once again you shouldn't rush to do it. It worked out last time, but this time it wouldn't, and it would be an unnecessary step. Let's just continue following the chain.
Next we have another Multiply, this time with a Texture Sample. Notice that the Texture Sample is Texture2D'PICKUPS.Health_Large.Materials.T_Pickups_Health_Large_Keg_EM', which we already have imported, just with a modified Alpha. Since this Multiply block is using all the RGB channels at once, and we have already established that they are all the same, we can just reuse our already-imported texture for our purposes.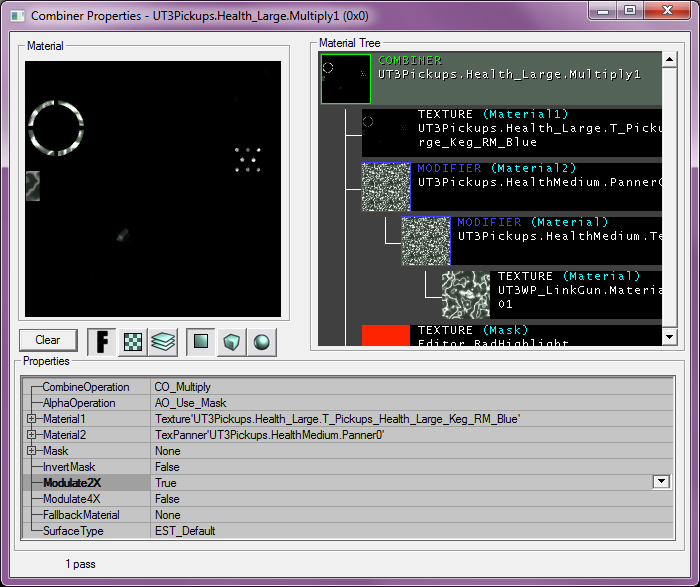 Just like before, create a Combiner (name it Multiply1, since we already have Multiply0), add Panner0 and T_Pickups_Health_Large_Keg_EM_Blue, set the combine operation to CO_Multiply. If you recall, we just skipped over one Multiply. Here is how we can get the same effect, without needing another combiner: set Modulate2X to True (since Modulate2X seems to resemble what we can see in the Material Editor the most; Modulate4X is a bit too much).
Moving on, we see an Add in the Material Editor. The other material is also a complex one, so let's analyse it first. It starts as a Texture Sample, Texture2D'PICKUPS.Health_Large.Materials.T_Pickups_Health_Large_Keg_E'. We don't have it imported yet, so this is a good time to do just that. Next the Texture Sample is multiplied by two. Again, ignore it for the moment. Then the result is fed to Add. Add, just like Multiply, is emulated with a Combiner. Create a new one, call it Add0, set Material1 to your newly imported texture and Material2 to Multiply1. Set the CombineOperation to CO_Add. There is one problem, however. Add combiners cannot make use of the Modulate*X parameters (they are ignored). So the Multiply that we recently skipped over cannot be represented faithfully. At this point, you have two options: either go back to GIMP and statically make the multiply operation of the texture there, or just ignore it, since the difference between a multiply of 2 and no multiply at all is fairly minimal. Note that the UT2004 engine does not allow you to use the same multiply with itself trick that we did in our Diffuse texture in this case, since it would require Add0 to combine two combiners, and combiners are considered complex materials (even if their result is static). So let's just ignore that Multiply for now.
With that done, there is nothing else left to do but to complete the channel. The Add block directly connects to the Emissive channel in the original. UT2004 Shaders don't have an Emissive channel, however. Instead, its functionality is attained by the use of two channels, Self-Illumination and Self-Illumination Mask. Both Emissive and Self-Illumination control what parts of the material glow in the dark.
Open the Shader's properties and set Add0 as the Self-Illumination. You'll see that the entire Shader becomes the same as Add0. That's because we are lacking a Self-Illumination Mask. In UT3, it's unnecessay, because it's generated automatically and on the fly. In UT2004, you need to do it manually, and sometimes it causes problems (in UT3 the Emissive can be dynamic, but in UT2004 you can only set a simple texture as the mask, not a TexPanner or anything else). This time around, though, we don't have any problems since the places we need to light up are in static parts of the texture. We still need to create a mask, however.
To do that, find the base Emissive texture. Usually it's denoted as ..._E, in our case T_Pickups_Health_Large_Keg_E. UT3 generates a mask by interpreting black as the Alpha channel, so that's exactly what we want to achieve here. Go back to GIMP once more, and load up the texture in question.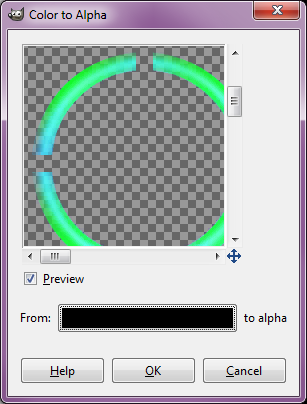 GIMP has a great feature that allows doing just that. Go to Colors → Color to Alpha... and press the From: button. This will open a palette. Set the colour to black, by either dragging the reticle with the mouse to the upper left corner, entering all 0 to the RGB slots or entering 000000 in the HTML notation field. The preview shows how the result will look like, and that's just what we need.
Now if you recall, this texture was incidentally also what got multiplied by two back then, but we couldn't apply the multiplication due to UT2004 limitations. So while we're at it, we can apply it now. Open the Layers tab, right-click on the only layer there is, and choose Duplicate Layer. Select the upper layer, then choose Screen from the Mode drop-down list. You can play around with this setting to get different values. Screen is closest to Multiply by 2, but for larger values, you would need to use Dodge (it's close to what a single ModulateX2 does). Even though there is a mode called Multiply, it doesn't work like it does in UT3.
Before exporting the edited texture, right-click on the top layer and choose Merge Down (Or Flatten Image, which is like Merge Down when applied to every layer). It will join both layers into one. You need to have a texture with only one layer in order to export it correctly, or else only the top layer will get exported. If you can't select the compression algorithm when exporting, you probably forgot to flatten the image. Now proceed to exporting the image, and choose DXT5 again. You can leave the name of the texture as it was originally. In UEd 3, import the texture (don't forget to check Alpha, and when you import it, if there is already a texture with the same name, the newly imported one will automatically overwrite the old one).
Due to the engine differences, it seems that the Screen effect still overshot the Multiply by 2 effect, and the result is a bit too cyan than it is in the original. You can just retrace your steps up to the duplicate layer part, or use the Undo History tab in GIMP to go back to the pre-Screen effect, and reimport the texture. It looks more true to the original that way. Do note that it pays to experiment with different options in order to get the desired effect, but you need to check the original for reference to see if you are doing the correct thing.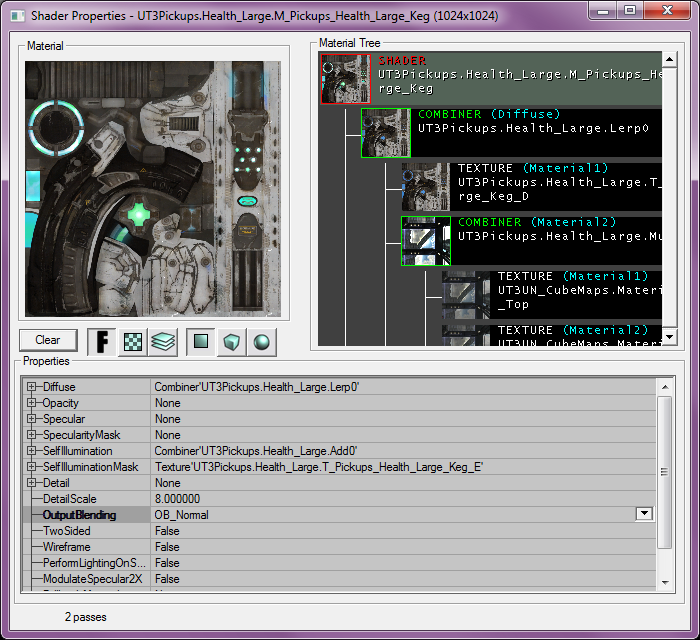 Once that is done, open the Shader properties again, and set the newly imported texture as the Self-Illumination Mask. The result is a nice, shining in the dark, shimmery effect.
Specular channel
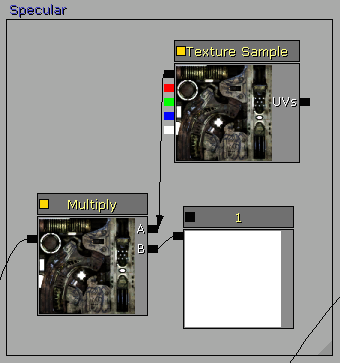
Now let's continue to descend to other channels in the UT3Ed Material Editor. Next up is Specular. Follow the arrow to see that it connects to the Specular box. This is really simple, it's just one Texture Sample and one Multiply. Oddly enough, the Multiply is connected to 1, and everyone knows that whatever we multiply by 1, we will get the original, unmodified result. So that Multiply block is completely useless and you can ignore it. The rest is just the Texture Sample. Import it into UEd 3 as usual.
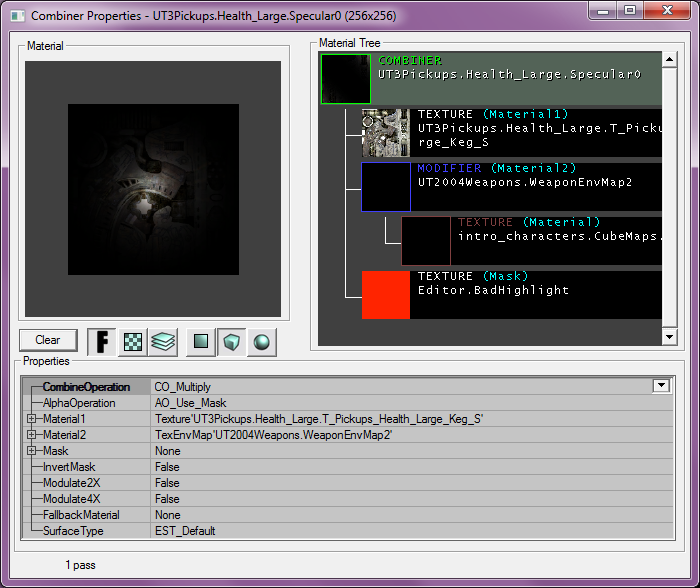 Before applying it to the Shader, however, you need to manually create a specular effect. Create a new Combiner and call it Specular0. In Material1, add the newly imported texture. Then open the package called UT2004Weapons, and find the TexEnvMap'UT2004Weapons.WeaponEnvMap2' (or just paste this reference, if you're lazy). It's a generic specular effect that works fairly fine, although it might be a bit too sharp in some cases. In any case, set the CombineOperation to CO_Multiply. Now set Specular0 as the Specular in your Shader. As you can see, what Specular does is create highlights, making the material look metallic/plastical.
Other channels and final notes
Next in the Material Editor is a channel called SpecularPower. It's related to UT2004 Specularity Mask channel. It controls which parts of the material are to be made specular (metallic-like), and which parts should not be affected. In this case, there is no SpecularPower applied, so let's not worry about that at the moment. It just means that the entire mesh will be metallic.
Next is Opacity and OpacityMask. This directly relates to the Opacity channel in UT2004 Shaders. However, if you recall, the Master Scalar Parameter disables the OpacityMask box, so you can skip (and break links of to make sure) these channels as well.
The next channels are TransmissionMask and TransmissionColor. These are rarely used and generally relate to Self-Illumination as well.
Normal is the normal map. As mentioned before, UT2004 unfortunately doesn't have the capability of displaying normal (bump) maps, so you might as well break this connection and ignore it, too.
The last channel is CustomLighting, but it is also rarely used and has no equivalent in UT2004.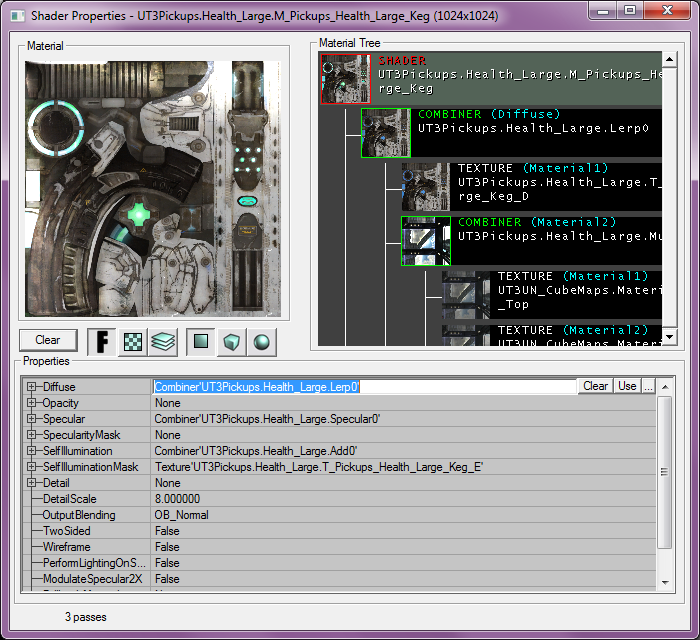 And that's it, we're nearly done. The material is now ported. However, there is still one concern, and it's a devious one: even though you might see the Shader correctly in the editor, it may very well not display correctly in-game. That affects the non-Direct3D 8 renderers (Direct3D 9 and OpenGL), which are the only renderers available on the 64-bit version of UT2004 and the Linux version of the game. It's important to keep the compatibility with them, because they do have users, and will have more users in the future as 32-bit software gets phased out.
What the non-D3D8 renderers cannot render is a long chain of combiners. In case one exists, the renderers will fall back to the Diffuse texture of the Shader (which is very unfortunate, since it doesn't fall back to what is defined in the Shader's FallbackMaterial, which could otherwise be used to extend the compatibility to those renderers). So you always need to test your materials with the non-D3D8 renderers and see if they display correctly or not.
In case it's not displayed correctly, try and minimise as many passes as possible from the offending material chain. Most often this issue appears with the Self-Illumination channel. There is no absolute advice that can be given about it, however, you just need to see what part of the chain is the least important to the final result, or what can be replaced by a static texture, and get rid of it. Be aware that expensive operations, like Alpha Blend with Mask or cubemaps, add more complexity than just combiners with Add or Multiply operations.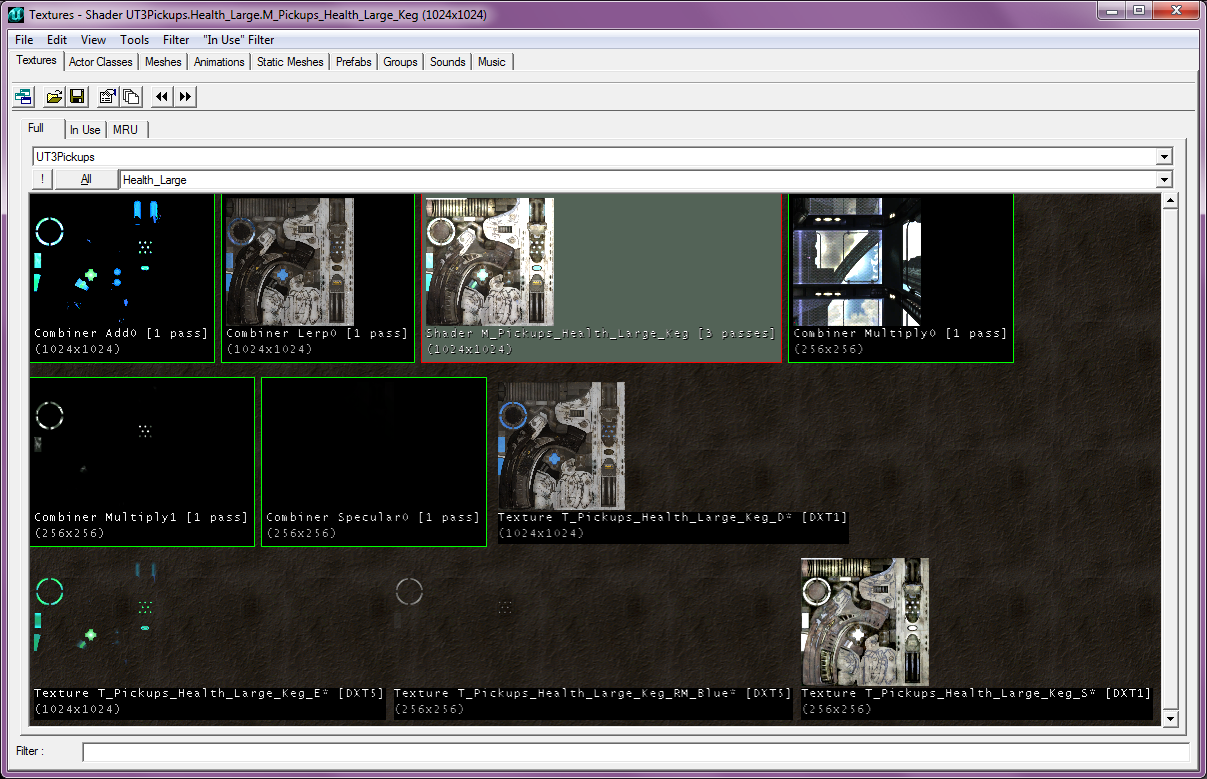 Thankfully, our example material does not trigger this behaviour, thus the porting of the material is complete. We end up with around 10 materials, one of which is the final Shader that we can put on our model and enjoy the similarity to the UT3 counterpart.